Say Goodbye to Downtime: Move Your VMs to Shared Storage

Break Free from Local Storage: Migrate Your Proxmox VMs to NFS for a High-Availability Cluster
Want to elevate your Proxmox cluster to the next level of reliability and performance? Migrating your VM disks from local storage to a shared NFS is a crucial step in that journey. This blog post guides you through the process, explaining the limitations of local storage and providing a clear, step-by-step migration guide. By the end, you'll be equipped to unlock the full potential of your Proxmox cluster with seamless live migration, effortless failover, and enhanced performance for your virtual machines.
Why Shared Storage is Essential for Your Proxmox Cluster
While Proxmox allows for local storage solutions like LVM-Thin, relying on them for your VMs can lead to significant drawbacks, especially when aiming for a robust and highly available cluster. Let's explore why transitioning to shared storage, such as NFS, is a game-changer.
My Experience with Local Storage Limitations
When I first delved into the world of Proxmox, I started with a single 256GB SSD. Eager to explore its capabilities, I rapidly deployed VMs and configured various services. Initially, everything ran smoothly. However, this honeymoon phase was short-lived. My local LVM storage quickly reached its capacity, rendering my VMs inaccessible and disrupting my services. This experience highlighted the critical need for a more scalable and resilient storage solution.
Even with the addition of a new 2TB NVMe M.2 drive, directly attaching it to my Proxmox node presented potential challenges:
- Limited Scalability: What happens when this drive inevitably fills up? Expanding storage would require additional PCIe slots, which may not be available.
- Single Point of Failure: Disk failures are a reality. A local disk failure means losing all VMs residing on it, leading to potential downtime and data loss.
- Hindered Migration: In a cluster environment, migrating VMs between nodes with local storage involves copying large amounts of data across the network, resulting in slow and inefficient transfers.
- High Availability Challenges: Achieving true high availability for your VMs requires shared storage, enabling rapid failover to another node in case of a host failure.
These considerations led me to seek a more robust solution: a TrueNAS server with an available M.2 slot. By leveraging my TrueNAS server to provide NFS shares, I could overcome the limitations of local storage and unlock the full potential of my Proxmox cluster.
Migrating VM Disks to NFS: A Step-by-Step Guide
Migrating your VM disks to an NFS share is a straightforward process within the Proxmox UI. Here's how:
-
Configure NFS Share: First, ensure you have a configured NFS share on your TrueNAS server (or other NFS server of your choice) and that it's accessible from your Proxmox node. (For detailed instructions on setting up an NFS share with TrueNAS and Proxmox, refer to this blog post.
-
Initiate Disk Migration:
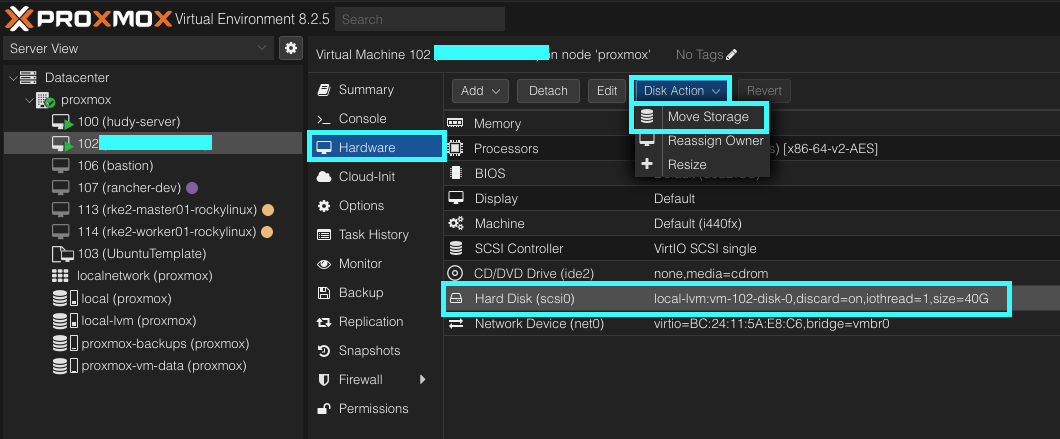
- Select the desired VM from the Proxmox UI.
- Navigate to Hardware.
- Select the Hard Disk you wish to migrate (it will display a value similar to local-lvm:vm-102-disk-0).
- Click on Disk Action and choose Move Storage.
-
Choose Target Storage:
- In the Move Disk dialog box, select your Target Storage as the NFS share you created.
-
Delete Source Disk (Optional):
- To reclaim space on your local storage, enable the Delete source checkbox. Rest assured, the source disk will only be deleted after the migration is successfully completed.
-
Start Migration:
- Click on Move disk to initiate the migration process.

- Click on Move disk to initiate the migration process.
Once the migration is complete, the Hard Disk value in the VM's hardware settings will be updated to reflect the new NFS storage path.
Embrace the Benefits of Shared Storage
Congratulations! You've successfully migrated your VM disk to a shared NFS. With this transition, you've eliminated the limitations of local storage and gained:
- Enhanced Scalability: Easily expand your storage capacity by adding more disks to your NFS server.
- Improved Resilience: Protect your VMs from local disk failures with redundant storage on your NFS server.
- Seamless Live Migration: Enjoy rapid and efficient live migration of VMs between nodes in your cluster.
- Effortless Failover: Achieve true high availability with automatic failover of VMs to another node in case of host failure.
No longer constrained by local storage limitations, you're free to explore the full potential of your Proxmox cluster. Spin up new services, experiment with different configurations, and enjoy the peace of mind that comes with a robust and highly available infrastructure.