Nutanix Karbon and Docker: Missing a Secure Registry?

Introduction:
Harbor is a Private Registry solution which helps in managing and serving container images in secure environment. In production environments we tend to use private registry to have better control of the images and its security.
Harbor Setup:
-
Environment:
1Operating System: Ubuntu 16.04 Desktop
-
Install Docker:
1stalin@registry-srv:~$ curl -fsSL https://download.docker.com/linux/ubuntu/gpg | sudo apt-key add -
2stalin@registry-srv:~$ sudo add-apt-repository "deb [arch=amd64] https://download.docker.com/linux/ubuntu $(lsb_release -cs) stable"
3stalin@registry-srv:~$ sudo apt-get update
4stalin@registry-srv:~$ sudo apt-get install -y docker-ce
Verify Docker service state
1sudo systemctl status docker --no-pager -l
Example output:
1● docker.service - Docker Application Container Engine
2   Loaded: loaded (/lib/systemd/system/docker.service; enabled; vendor preset: enabled)
3   Active: active (running) since Fri 2020-04-10 20:49:29 IST; 2min 27s ago
4     Docs: https://docs.docker.com
5 Main PID: 4315 (dockerd)
6   CGroup: /system.slice/docker.service
7           └─4315 /usr/bin/dockerd -H fd:// --containerd=/run/containerd/containerd.sock
-
Download docker-compose binary
1stalin@registry-srv:~$ sudo curl -L "https://github.com/docker/compose/releases/download/1.25.5/docker-compose-$(uname -s)-$(uname -m)" -o /usr/local/bin/docker-compose
2stalin@registry-srv:~$ sudo chmod +x /usr/local/bin/docker-compose
3stalin@registry-srv:~$ sudo ln -s /usr/local/bin/docker-compose /usr/bin/docker-compose
-
Setup Certificates
Create a staging directory first to organize the certificates
1stalin@registry-srv:~$ mkdir ~/harbor_certs/
2stalin@registry-srv:~$ cd ~/harbor_certs/
Create CA
1stalin@registry-srv:~$ openssl genrsa -out ca.key 4096
2stalin@registry-srv:~$ openssl req -x509 -new -nodes -sha512 -days 3650 \
3 -subj "/C=IN/ST=Kerala/L=Chalakudy/O=demo/OU=Personal/CN=ca.example.com" \
4 -key ca.key \
5 -out ca.crt
Create SSL extension file
 1stalin@registry-srv:~$ cat > v3.ext <<-EOF
 2authorityKeyIdentifier=keyid,issuer
 3basicConstraints=CA:FALSE
 4keyUsage = digitalSignature, nonRepudiation, keyEncipherment, dataEncipherment
 5extendedKeyUsage = serverAuth
 6subjectAltName = @alt_names
 7
 8[alt_names]
 9DNS.1=example.com
10DNS.2=registry-srv.example.com
11DNS.3=registry-srv
12EOF
Create a Certificate Signing Request(CSR) for Harbor’s nginx service
1stalin@registry-srv:~$ openssl genrsa -out registry-srv.example.com.key 4096
2stalin@registry-srv:~$ openssl req -sha512 -new \
3    -subj "/C=IN/ST=Kerala/L=Chalakudy/O=demo/OU=Personal/CN=registry-srv.example.com" \
4    -key registry-srv.example.com.key \
5    -out registry-srv.example.com.csr
Generate and Sign Certificates
1stalin@registry-srv:~$ openssl x509 -req -sha512 -days 3650 \
2    -extfile v3.ext \
3    -CA ca.crt -CAkey ca.key -CAcreateserial \
4    -in registry-srv.example.com.csr \
5    -out registry-srv.example.com.crt
After signing , we will get output like below
1Signature ok
2subject=/C=IN/ST=Kerala/L=Chalakudy/O=demo/OU=Personal/CN=registry-srv.example.com
3Getting CA Private Key
Create certificate directory for harbor
1stalin@registry-srv:~$ sudo mkdir -p /data/cert/
2stalin@registry-srv:~$ sudo cp  registry-srv.example.com.crt registry-srv.example.com.key /data/cert/
-
Download Harbor offline installer.
1stalin@registry-srv:~$ sudo curl https://storage.googleapis.com/harbor-releases/release-1.7.0/harbor-offline-installer-v1.7.1.tgz -O
2stalin@registry-srv:~$ tar -xvf harbor-offline-installer-v1.7.1.tgz
Update Harbor Configration file.
1stalin@registry-srv:~$ cd harbor
2stalin@registry-srv:~$ sudo sed -i 's/hostname = reg.mydomain.com/hostname = registry-srv.example.com/' harbor.cfg
3stalin@registry-srv:~$ sudo sed -i 's/ssl_cert = \/data\/cert\/server.crt/ssl_cert = \/data\/cert\/registry-srv.example.com.crt/' harbor.cfg
4stalin@registry-srv:~$ sudo sed -i 's/ssl_cert_key = \/data\/cert\/server.key/ssl_cert_key = \/data\/cert\/registry-srv.example.com.key/' harbor.cfg
5stalin@registry-srv:~$ sudo sed -i 's/ui_url_protocol = http/ui_url_protocol = https/' harbor.cfg
Install Harbor & Start Harbor.
1stalin@registry-srv:~$ sudo ./install.sh --with-notary --with-clair --with-chartmuseum
You should be able to see a successful reposnse as such:
 1[Step 0]: checking installation environment ...
 2
 3Note: docker version: 20.10.7
 4
 5Note: docker-compose version: 1.25.5
 6
 7[Step 1]: loading Harbor images ...
 8Loaded image: goharbor/registry-photon:v2.6.2-v1.7.1
 9Loaded image: goharbor/harbor-migrator:v1.7.1
10Loaded image: goharbor/harbor-adminserver:v1.7.1
11Loaded image: goharbor/harbor-core:v1.7.1
12Loaded image: goharbor/harbor-log:v1.7.1
13Loaded image: goharbor/harbor-jobservice:v1.7.1
14Loaded image: goharbor/notary-server-photon:v0.6.1-v1.7.1
15Loaded image: goharbor/clair-photon:v2.0.7-v1.7.1
16Loaded image: goharbor/harbor-portal:v1.7.1
17Loaded image: goharbor/harbor-db:v1.7.1
18Loaded image: goharbor/redis-photon:v1.7.1
19Loaded image: goharbor/nginx-photon:v1.7.1
20Loaded image: goharbor/harbor-registryctl:v1.7.1
21Loaded image: goharbor/notary-signer-photon:v0.6.1-v1.7.1
22Loaded image: goharbor/chartmuseum-photon:v0.7.1-v1.7.1
23
24
25[Step 2]: preparing environment ...
26Generated and saved secret to file: /data/secretkey
27Generated configuration file: ./common/config/nginx/nginx.conf
28Generated configuration file: ./common/config/adminserver/env
29Generated configuration file: ./common/config/core/env
30Generated configuration file: ./common/config/registry/config.yml
31Generated configuration file: ./common/config/db/env
32Generated configuration file: ./common/config/jobservice/env
33Generated configuration file: ./common/config/jobservice/config.yml
34Generated configuration file: ./common/config/log/logrotate.conf
35Generated configuration file: ./common/config/registryctl/env
36Generated configuration file: ./common/config/core/app.conf
37Generated certificate, key file: ./common/config/core/private_key.pem, cert file: ./common/config/registry/root.crt
38Copying sql file for notary DB
39Generated certificate, key file: ./cert_tmp/notary-signer-ca.key, cert file: ./cert_tmp/notary-signer-ca.crt
40Generated certificate, key file: ./cert_tmp/notary-signer.key, cert file: ./cert_tmp/notary-signer.crt
41Copying certs for notary signer
42Copying notary signer configuration file
43Generated configuration file: ./common/config/notary/signer-config.postgres.json
44Generated configuration file: ./common/config/notary/server-config.postgres.json
45Copying nginx configuration file for notary
46Generated configuration file: ./common/config/nginx/conf.d/notary.server.conf
47Generated and saved secret to file: /data/defaultalias
48Generated configuration file: ./common/config/notary/signer_env
49Generated configuration file: ./common/config/clair/postgres_env
50Generated configuration file: ./common/config/clair/config.yaml
51Generated configuration file: ./common/config/clair/clair_env
52Create config folder: ./common/config/chartserver
53Generated configuration file: ./common/config/chartserver/env
54The configuration files are ready, please use docker-compose to start the service.
55
56
57[Step 3]: checking existing instance of Harbor ...
58
59
60[Step 4]: starting Harbor ...
61Creating network "harbor_harbor" with the default driver
62Creating network "harbor_harbor-clair" with the default driver
63Creating network "harbor_harbor-notary" with the default driver
64Creating network "harbor_harbor-chartmuseum" with the default driver
65Creating network "harbor_notary-sig" with the default driver
66Creating harbor-log ... done
67Creating registryctl        ... done
68Creating redis              ... done
69Creating registry           ... done
70Creating harbor-db          ... done
71Creating harbor-adminserver ... done
72Creating harbor-core        ... done
73Creating chartmuseum        ... done
74Creating harbor-jobservice  ... done
75Creating harbor-portal      ... done
76Creating notary-signer      ... done
77Creating clair              ... done
78Creating nginx              ... done
79Creating notary-server      ... done
80
81✔ ----Harbor has been installed and started successfully.----
82
83Now you should be able to visit the admin portal at https://registry-srv.example.com.
84For more details, please visit https://github.com/goharbor/harbor .
Also , you can use docker-compose to verify the health of containers
 1stalin@registry-srv:~$ sudo docker-compose ps
 2      Name                     Command                  State                                      Ports
 3---------------------------------------------------------------------------------------------------------------------------------------
 4chartmuseum         ./docker-entrypoint.sh           Up (healthy)   9999/tcp
 5clair               ./docker-entrypoint.sh           Up (healthy)   6060/tcp, 6061/tcp
 6clair-adapter       /clair-adapter/clair-adapter     Up (healthy)   8080/tcp
 7harbor-core         /harbor/harbor_core              Up (healthy)
 8harbor-db           /docker-entrypoint.sh            Up (healthy)   5432/tcp
 9harbor-jobservice   /harbor/harbor_jobservice  ...   Up (healthy)
10harbor-log          /bin/sh -c /usr/local/bin/ ...   Up (healthy)   127.0.0.1:1514->10514/tcp
11harbor-portal       nginx -g daemon off;             Up (healthy)   8080/tcp
12nginx               nginx -g daemon off;             Up (healthy)   0.0.0.0:4443->4443/tcp, 0.0.0.0:80->8080/tcp, 0.0.0.0:443->8443/tcp
13notary-server       /bin/sh -c migrate-patch - ...   Up
14notary-signer       /bin/sh -c migrate-patch - ...   Up
15redis               redis-server /etc/redis.conf     Up (healthy)   6379/tcp
16registry            /home/harbor/entrypoint.sh       Up (healthy)   5000/tcp
17registryctl         /home/harbor/start.sh            Up (healthy)
You should be able to now access the Harbor UI by using the following link: https://registry-srv.example.com. Ensure DNS/host file entries are in place. Else, use the IP address of the Harbor registry server. You can obtain that from ip addr command.
NOTE: Punch in the IP address that you have used for your setup. The above IP is what I have used in my setup.
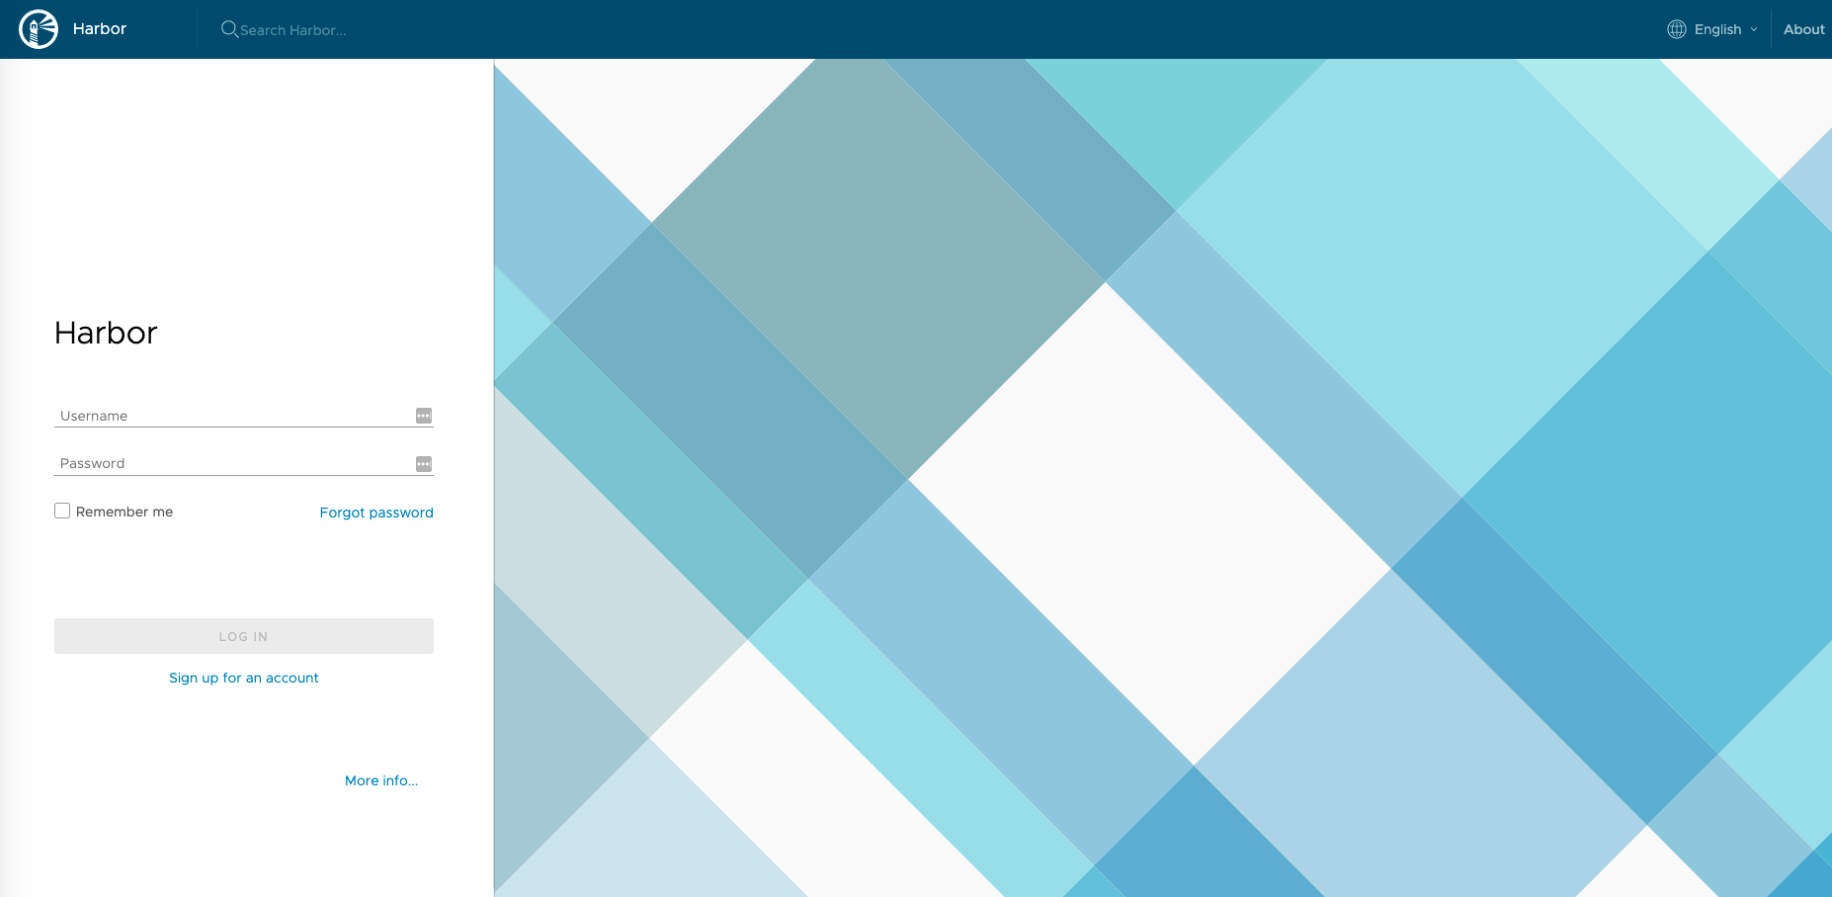
You will be presented with a similar login page.
-
Login and Configuration:
The default username and password is:
1username: admin
2password: Harbor12345
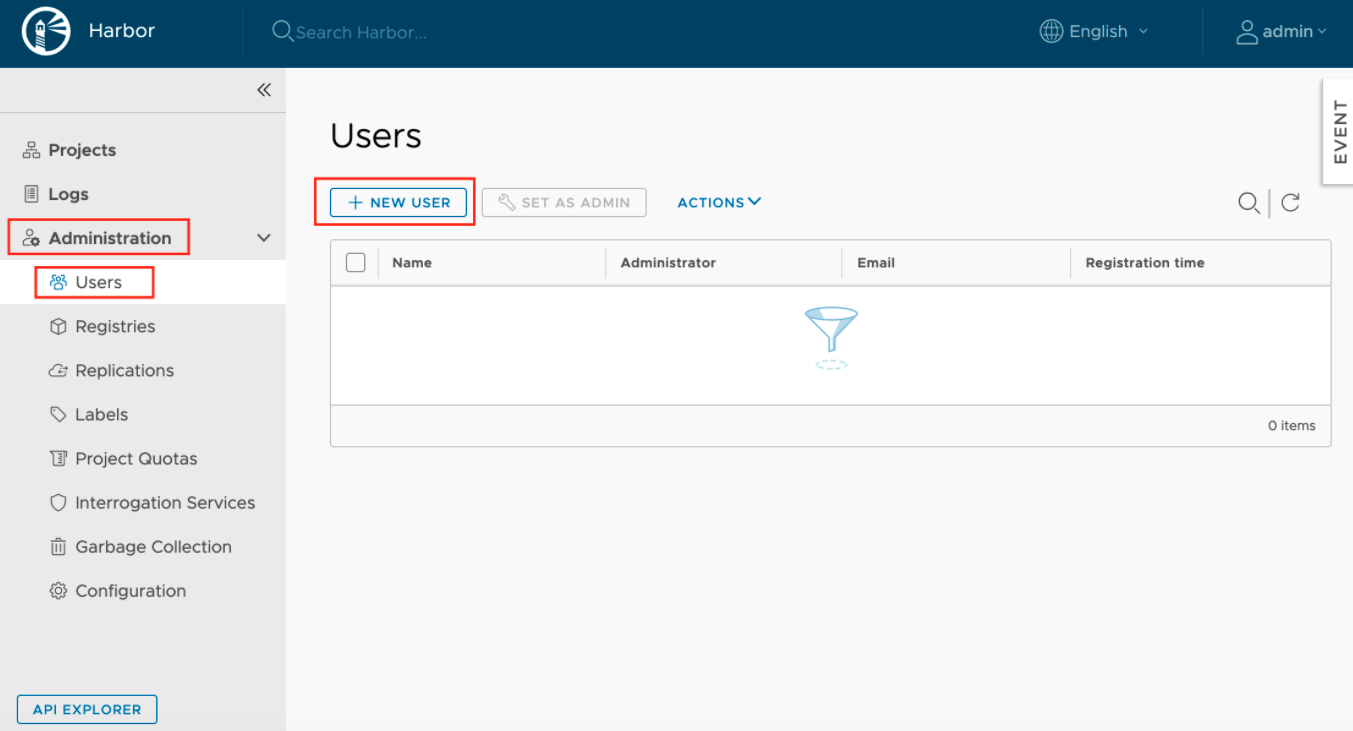
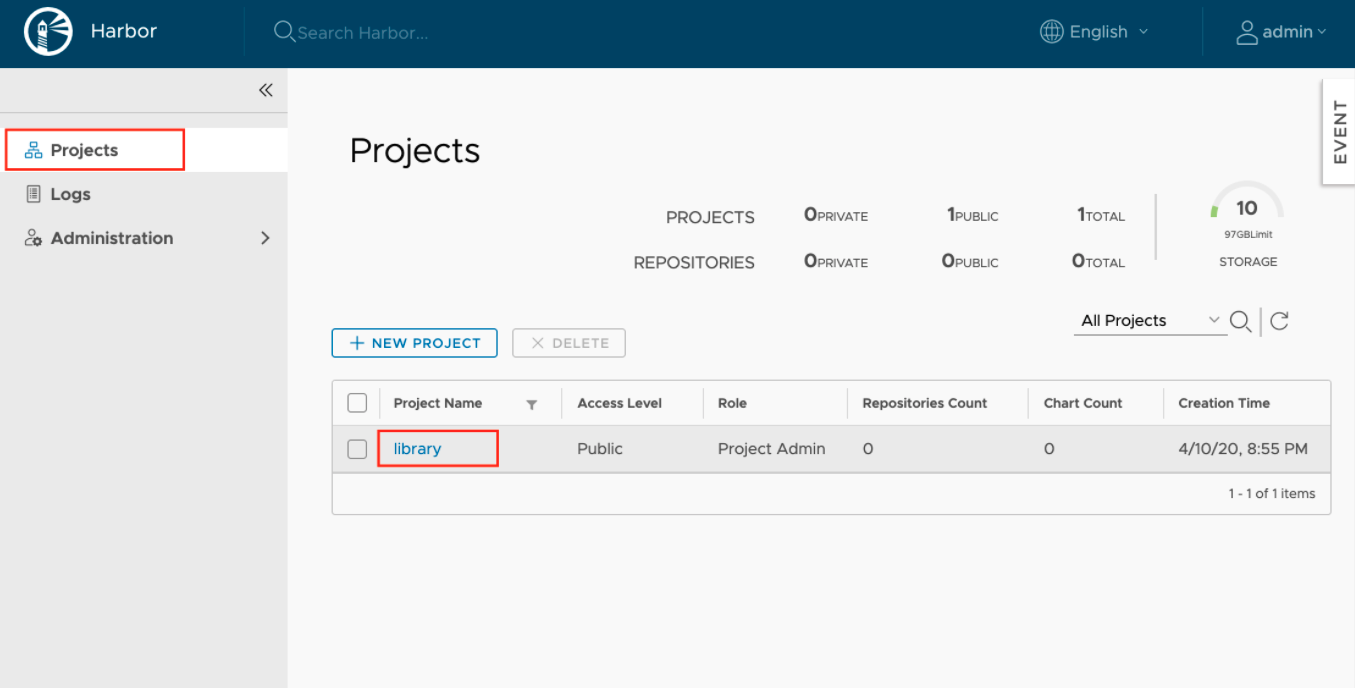
We shall now create a new user and then we will add that user to the default public project on Harbor.
1.) Create User:
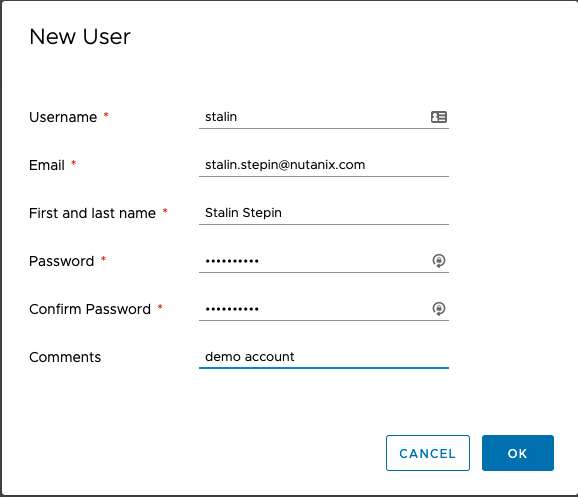
2.) Fill the user details and set password for the account:
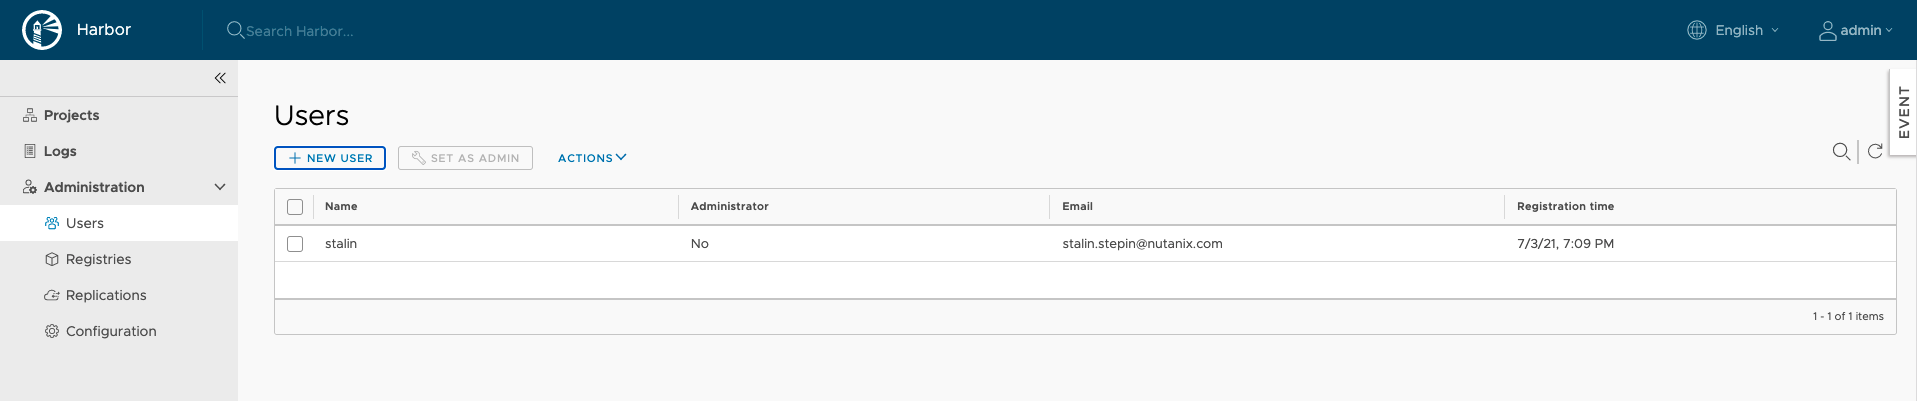
Once you click on OK you should be able to list the user.
3.) Add user to the library project.
4.) From there, click on Members and then selects + USER.
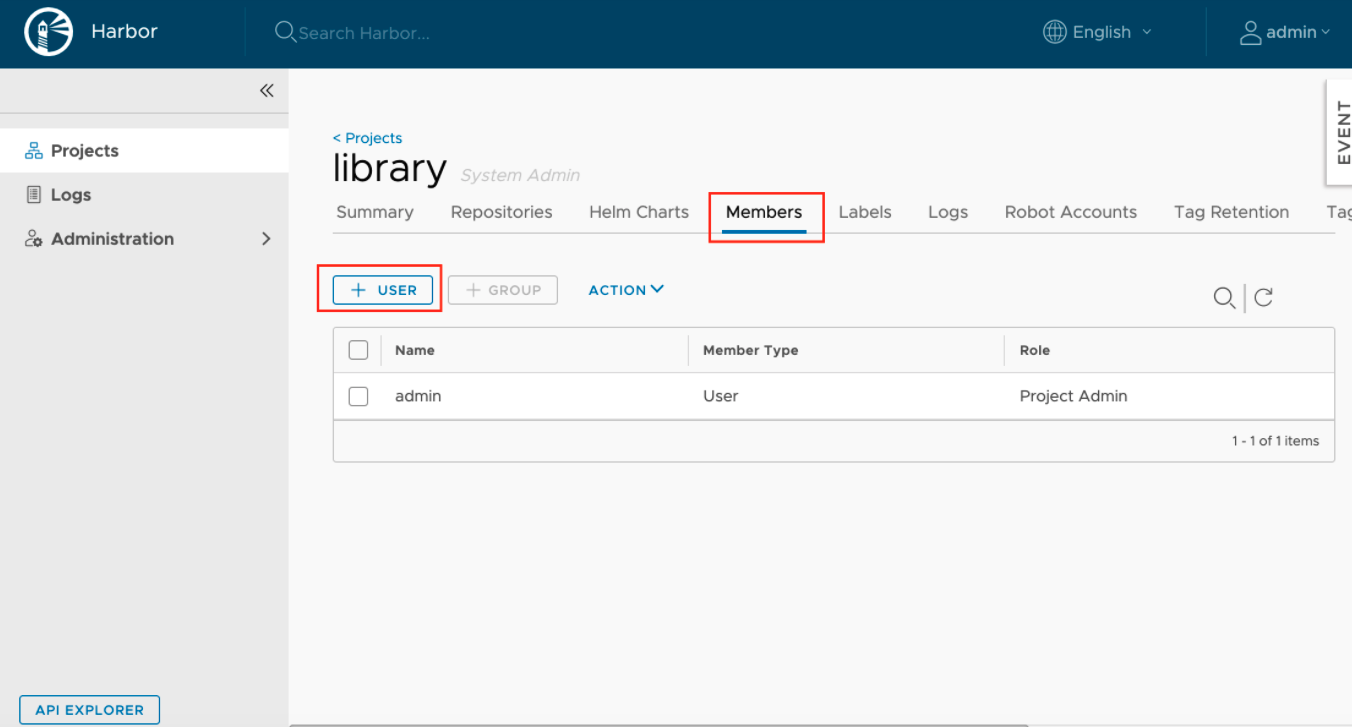
5.) Give the user Developer Role and click on OK. You should be able to see the user added to the list:
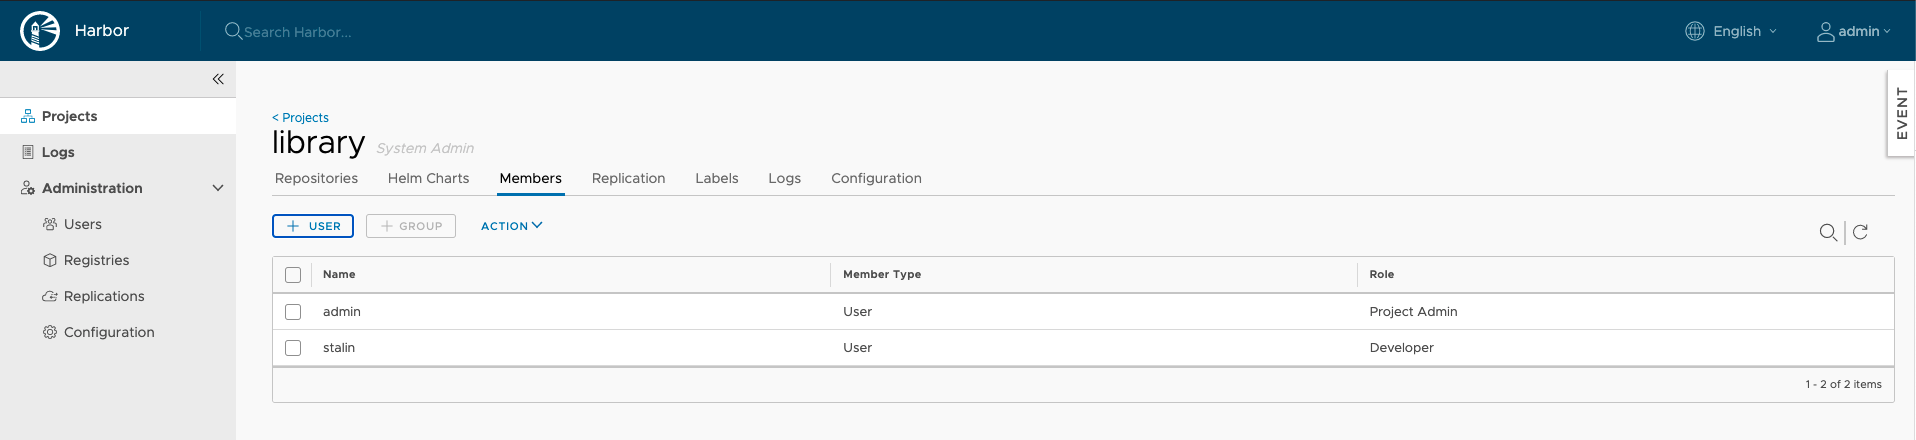
Going forward we can use this account to push images to private registry.
-
Client Certificates
With the already generated CA certificate, we will generate docker client certificates to use with Karbon Kubernetes cluster. So login back to your Harbor server again and move to the directory where the CA certificates are present. In our case:
1stalin@registry-srv:~$ cd ~/harbor_certs/
Generate a CSR for docker and get it signed for the client
1stalin@registry-srv:~$ openssl genrsa -out docker-client.example.com.key 4096
2stalin@registry-srv:~$ openssl req -sha512 -new \
3    -subj "/C=IN/ST=Kerala/L=Chalakudy/O=demo/OU=Personal/CN=docker-client.example.com" \
4    -key docker-client.example.com.key \
5    -out docker-client.example.com.csr
Sign Certificates
1stalin@registry-srv:~$ openssl x509 -req -sha512 -days 3650 \
2    -extfile v3.ext \
3    -CA ca.crt -CAkey ca.key -CAcreateserial \
4    -in docker-client.example.com.csr \
5    -out docker-client.example.com.crt
You will get an output like below:
1Signature ok
2subject=/C=IN/ST=Kerala/L=Chalakudy/O=demo/OU=Personal/CN=docker-client.example.com
3Getting CA Private Key
Docker needs the certificate in PEM format , so lets convert the client certificate.
1stalin@registry-srv:~$ openssl x509 -inform PEM -in docker-client.example.com.crt -out docker-client.example.com.cert
From here, copy the below files to the PC (aka - Prism Central) VM :
1nutanix@NTNX-10-68-xx-xx-A-PCVM:~/k8s-harbor-registry.example.com$ ls -ltr
2total 16
3-rw-r--r--. 1 nutanix nutanix 2037 Jul  3 16:08 ca.crt
4-rw-r--r--. 1 nutanix nutanix 3243 Jul  3 16:08 docker-client.example.com.key
5-rw-r--r--. 1 nutanix nutanix 4188 Jul  3 19:15 docker-client.example.com.cert
Karbon Setup:
For the Karbon Kubernetes clusters to use the Harbor private registry, you need to first make Karbon aware that the registry is present and it can be accessed using the IP address or FQDN via the karbonctl command. To do this, follow the procedure below:
-
Karbon Login:
You need to login to Karbon from CLI first to start using karbonctl on the PC VM:
1nutanix@NTNX-10-68-xx-xx-A-PCVM:~$ cd karbon
2nutanix@NTNX-10-68-xx-xx-A-PCVM:~/karbon$ ./karbonctl login --pc-username [email protected]
3Please enter the password for the PC user: [email protected]
4Login successful
-
Karbon configuration:
Though Karbon supports basic and certificate based authentication, it does not support token based authentication yet. Unfortunately, docker uses token based authentication by default when making an API call to connect to private registry. Hence, unless we ask Karbon to skip this pre-check, the private registry addition task will continue to fail.
To skip this pre-check, you need to do the below:
1nutanix@NTNX-10-68-xx-xx-A-PCVM:~$ sudo vim /home/docker/karbon_core/karbon_core_config.json
Add the following "-skip-post-private-registry-prechecks" to the entry_point section of the file:
1"image": "karbon-core:v2.2.2",
2"entry_point": [
3        "/karbon",
4        "-debug=true",
5        "-v=4",
6        "-logtostderr",
7        "-skip-post-private-registry-prechecks"
Restart karbon_core docker container on PC VM to reflect the changes:
1nutanix@NTNX-10-68-xx-xx-A-PCVM:~/karbon$ genesis stop karbon_core; cluster start
Docker Client Certificate:
Next, you need to concatenate the docker-client.example.com.cert with the ca.crt content as docker expects the complete chain. To do this, open docker-client.example.com.cert and add ca.crt contents to it. The docker-client.example.com.cert certificate should finally look like the below:
 1nutanix@NTNX-10-68-xx-xx-A-PCVM:~/k8s-harbor-registry.example.com$ cat docker-client.example.com.cert
 2-----BEGIN CERTIFICATE-----
 3MIIGBjCCA+6gAwIBAgIJALZm8SLBU8UoMA0GCSqGSIb3DQEBDQUAMHAxCzAJBgNV
 4BAYTAklOMQ8wDQYDVQQIDAZLZXJhbGExEjAQBgNVBAcMCUNoYWxha3VkeTENMAsG
 5A1UECgwEZGVtbzERMA8GA1UECwwIUGVyc29uYWwxGjAYBgNVBAMMEWNhLmNvZGVk
 6ZXZvcHMuY29tMB4XDTIxMDcwMzE0MDI0NloXDTMxMDcwMTE0MDI0NlowezELMAkG
 7A1UEBhMCSU4xDzANBgNVBAgMBktlcmFsYTESMBAGA1UEBwwJQ2hhbGFrdWR5MQ0w
 8CwYDVQQKDARkZW1vMREwDwYDVQQLDAhQZXJzb25hbDElMCMGA1UEAwwcZG9ja2Vy
 9LWNsaWVudC5jb2RlZGV2b3BzLmNvbTCCAiIwDQYJKoZIhvcNAQEBBQADggIPADCC
10AgoCggIBAMN+bt95u4ma9LTUTIwRlyvBF05nmRfifQNTWOlbY2Woy13XPygC5EK/
11Erf28P7CR7xsppg5i1jUTVFd4jAAPhI2eoECPsAWwONJhmnF+2iklw8HyUhru5C2
12Iz/uotFbpkW3ozQAjvYfwbRDXLyCK3hfSCR3pKpl7dSGS/Q5CN35pg79lZbGn51i
137FbkSechIyV0Nq86jHksf0gtG01TtdNil4INzX7tBs8zoH4ISDi0SFdtaudxeQnp
14Uxsnidj7mrcgP3Myv6DJAObAlu9P1KHkOi/5oo0D9Lc3xG6kL5tirs27T2aaPqQV
150jkHlpUcVBbLXTa23i1ac6bG1WASxL8dIqhMMyS4MyPAEDmjmgCuTIvOAlSwM7j0
16ZkS8tRnLzV07wttWtDPuOXgwhkdCpm4wO5LiHL4MEJd1Ygc3Tdyj/2TzX2mqVRmJ
17VH9qBHx9k89YBVm20pa6ojoHkYB6InHpma73YwYggJ985v82rJZSNUpYCHiCRSfG
18SVXV5K/HnlcQpxAv2S+5uAG4+HA3q3s8sEMTUmgDUT4TrIiq5QOF0mx/SYhpFQj9
19oOzbJfAfWq4LPOdkoN+tkhSqxNHqXnXkSOTdWrKI3yH0D4YiGRial7v061BHxj8E
20qHcajZLMGmLp86eYWUBBlQJg8k4R9Pl6YrvmJnFiXXVqInqTN5EFAgMBAAGjgZcw
21gZQwHwYDVR0jBBgwFoAUTWWR+U+lj1J5n3S6Kukwrd4D5acwCQYDVR0TBAIwADAL
22BgNVHQ8EBAMCBPAwEwYDVR0lBAwwCgYIKwYBBQUHAwEwRAYDVR0RBD0wO4IOY29k
23ZWRldm9wcy5jb22CG3JlZ2lzdHJ5LXNydi5jb2RlZGV2b3BzLmNvbYIMcmVnaXN0
24cnktc3J2MA0GCSqGSIb3DQEBDQUAA4ICAQA3Ap0CNrPBUhgm47ZqelaRa97TMxSp
253oJxroGhVybIz7pxeQADjabQn9qKtcBD8hzkPyWSoCqbMaKjSV+V5IiQPHebMRXV
268N7eO0yAEoe8+bDHW0pTuUW+bEZYFcqklx5hZUwGKQdblsP61ucL2bSKv8Ey67fS
27jCR+grlCFrpqldUu3JqLTCOTtPGX7OO5oBQPKOOaQx4lFG6XdJSrnVcRBmz9fMfn
28tZ1hSJegTWUC5SLDoNh7sDze+jtEi3zHP1aZgaZlQcm/bt8IrXGZ53M+8hKFQQb1
29zn4bQWlIIRDb+d48WrMbu2KDU8f10OxFekOTqj68KDozxZJeYLIop2jY+jF/eLtm
30qCWutev5OSqoYASibMHB0eW9ZB2T+fooqrpUNpcnVPySsCwmEt8+nOU1HqEYTLtR
31Z+JlzFClivSMa7IVafAkGReiqideNB02tWv0QiH302hb4e72g+EGtjxPJHGxrLUF
32+NUrpE1IjooTp+xRjAiaeXvQjrqCmlVbLvnno9xFDGpn+KpY907hztq/eoPbQnlN
33ewu1hbYu/Pe1eVfvYN7lksKJUlFOaENG7xDHmfaPgHCf5s82mG4hbzFFLYD6eUNX
34IlILIczCIfrKy46nDQsPryMrw6Xt3YUkJ/l4JiWw2RBkmfZ0GNtKbCgBdNslq0Sj
35fDpZqyIz/zB+ww==
36-----END CERTIFICATE-----
37-----BEGIN CERTIFICATE-----
38MIIFszCCA5ugAwIBAgIJAPO1cQX+QQe8MA0GCSqGSIb3DQEBDQUAMHAxCzAJBgNV
39BAYTAklOMQ8wDQYDVQQIDAZLZXJhbGExEjAQBgNVBAcMCUNoYWxha3VkeTENMAsG
40A1UECgwEZGVtbzERMA8GA1UECwwIUGVyc29uYWwxGjAYBgNVBAMMEWNhLmNvZGVk
41ZXZvcHMuY29tMB4XDTIxMDcwMzEzMTExOVoXDTMxMDcwMTEzMTExOVowcDELMAkG
42A1UEBhMCSU4xDzANBgNVBAgMBktlcmFsYTESMBAGA1UEBwwJQ2hhbGFrdWR5MQ0w
43CwYDVQQKDARkZW1vMREwDwYDVQQLDAhQZXJzb25hbDEaMBgGA1UEAwwRY2EuY29k
44ZWRldm9wcy5jb20wggIiMA0GCSqGSIb3DQEBAQUAA4ICDwAwggIKAoICAQDLF9/J
45xei29ndhpi9zeedZs8HXFefjWj03GqDBstS4afirpUP3DIiC/G0N7AQezeL2btCj
46KNp3iluGmKeT5SZ+f7im1rTAx7Svf2osMlPT2rWtpmgvOopylmoEjpPNrCKUkWYU
47J7fn+xKlOltcQJHTqH5tWNTD2cd6VUBl+x/5xJB+s3ywx4gc2cCljYFBx5cm6XKR
48jvo5p1b2brmj2vb7M5rhwwCMj6kjlHAD42CX1VL1Kbr8DP2uyKtwPXBa8W79foR5
49+w1VrQytyHYnxjWfGVnRjGzsMHKqXscTmrOPjPMg0qQQM6MhMzwkwZPZ+5dm0fR5
50ulK1QvcSCfytN4W2/Frtl4ob5C2/MxtGBiIecrw4IXarQdBNoPnCYcbTx3sok/RN
51pteycsB3ZmbkHPX/YRc3qvGXAyKZfjDfgT+ICcXZRjL6OBw7fTS+lJkCfhZq6wCV
52aU/L92zNinQ+ksQ84LeY234M4iEZsshDXQ1zo1K/FFhVGS+M0pG3Wa23ZHm8+Niu
53xxIdL0O1f3am3n6jzHVH4bI9QkFA5T8skrhLuS9ZwKC8F6sjYuN7b+zEjHx+wdwX
54x84kfSPD5dmsqQCv2w0H4I5GezEnE2pMqJXf4PpVJjX8KoctWNb58R4nWiFJRf1h
55ojdT5KkYLQQFo32JUChdK2A94vBd6zuzadNzTQIDAQABo1AwTjAdBgNVHQ4EFgQU
56TWWR+U+lj1J5n3S6Kukwrd4D5acwHwYDVR0jBBgwFoAUTWWR+U+lj1J5n3S6Kukw
57rd4D5acwDAYDVR0TBAUwAwEB/zANBgkqhkiG9w0BAQ0FAAOCAgEAEft1uBGR29IX
58vueaH3zerDZUVKiAwIIYw5s+DurVusOuvEJ9BaBAn8+L8KJJ5MSlKM+0n97IxD33
59RN1rN1l+hIuFxQ51hkNLrdVcC1fyyCXvOYagmsjxXi8i7HpbelJpB1AFJquOl/OC
60/f40rIYlYyyp01dX5QiYht70jDXPp/QqbryUZZY2nLXb7J9zth9/wDOxsH4YjyfY
61jCmapvGB7Qc7Q2o6b0nK1ADZjhympM7xkRL87D/l2ceOEDifaKWfSsS2MfEmJEWR
62fllgAFyh46ykbEiTUe5Ngit3oVg/zmhrR41BZ8UOpc0cwNt1Ka+yh7NEmxzQpd92
63v5FvraCPBcPjefQ5gj8G0c+8Waw8njVgV0pyR28Rt94WarUPunrtjSayQ1r8xohP
64W6FMLJ124RLB6kvCUsvjqfypnFJMaSkoBANdmE7SthijUFC3t/v4xemUeejGFChI
65+shMCUqWeXj+JbKkwWSbmGNd0JTgNwTf5KNTKTJQ6xZ4IFqp7aUXyI6pV6oYC2UT
66zI/bRbwkTbn8fEaf/H2qD6FUFIpu4BzJ3+OcPvc+K1YGkgbI6/Wg1WIEcDRpNzsY
67mH0IOcHjqDqAqX2G7eUCC/BZfbuGkQk8ra/oMGyt4VtXtmb9QxzGQyHL64d51vhR
684C4Tlxctd3W1FxrsAqtYS7BHuhgoaRc=
69-----END CERTIFICATE-----
-
Harbor configuration with Karbon
You should now have everything to configure the Harbor private registry with Karbon. Simply fire the below command to add private registry with Karbon:
1nutanix@NTNX-10-68-xx-xx-A-PCVM:~/karbon$ ./karbonctl registry add --name harbor --url registry-srv.example.com --username admin --password Harbor12345 --cert-file /home/nutanix/k8s-harbor-registry.example.com/docker-client.example.com.cert
2Successfully add private registry to Karbon: [POST /karbon/v1-alpha.1/registries][202] postPrivateRegistryAccepted  &{Endpoint:0xc000516050 Name:0xc000516070 UUID:0xc000516080}
Verify, if the addition was successful:
1nutanix@NTNX-10-68-xx-xx-A-PCVM:~/karbon$ ./karbonctl registry list
2Name      UUID                                    Endpoint
3harbor    ae213544-5a16-44d7-760c-d1aa46639e1e    registry-srv.example.com
You need to now integrate the Karbon Kubernetes cluster with Harbor registry using the below method:
1nutanix@NTNX-10-68-xx-xx-A-PCVM:~/karbon$ ./karbonctl cluster registry add --cluster-name stalin-k8s-1 --registry-name harbor
2Successfully submitted request to add private registry config "harbor" to k8s cluster "stalin-k8s-1": Task UUID: 951ee151-a946-4173-8df3-9c9d4734f7c2
-
Docker image operation on Harbor
For the k8s cluster to consume docker image, you need to push images to the docker private registry. To do this you must be first authenticated with the Harbon private registry.
Login to Harbor private registry from development machine which has internet access:
1[stalin@devbox ~]$ sudo docker login registry-srv.example.com
2Username: stalin
3Password:
4WARNING! Your password will be stored unencrypted in /root/.docker/config.json.
5Configure a credential helper to remove this warning. See
6https://docs.docker.com/engine/reference/commandline/login/#credentials-store
7
8Login Succeeded
Pull nginx docker image from the internet using the below command:
 1[stalin@devbox ~]$ docker pull nginx
 2Using default tag: latest
 3Got permission denied while trying to connect to the Docker daemon socket at unix:///var/run/docker.sock: Post http://%2Fvar%2Frun%2Fdocker.sock/v1.39/images/create?fromImage=nginx&tag=latest: dial unix /var/run/docker.sock: connect: permission denied
 4[nutanix@karbon-stalin-k8s-1-088899-k8s-master-0 ~]$ sudo docker pull nginx
 5Using default tag: latest
 6latest: Pulling from library/nginx
 7b4d181a07f80: Pull complete
 8edb81c9bc1f5: Pull complete
 9b21fed559b9f: Pull complete
10apiVersion: v1
1103e6a2452751: Pull complete
12b82f7f888feb: Pull complete
135430e98eba64: Pull complete
14Digest: sha256:47ae43cdfc7064d28800bc42e79a429540c7c80168e8c8952778c0d5af1c09db
15Status: Downloaded newer image for nginx:latest
Tag the downloaded image with the harbor private registry details:
1[stalin@devbox ~]$ sudo docker tag nginx:latest registry-srv.example.com/library/stalin/nginx:latest
Push the image to Harbor private registry:
1[stalin@devbox ~]$ sudo docker push registry-srv.example.com/library/stalin/nginx
2The push refers to repository [registry-srv.example.com/library/stalin/nginx]
3c6d74dcb7fe7: Pushed
4b50a193ebf2e: Pushed
5165eb6c3c0d3: Pushed
6cf388fcf3527: Pushed
72418679ca01f: Pushed
8764055ebc9a7: Pushed
9latest: digest: sha256:2f1cd90e00fe2c991e18272bb35d6a8258eeb27785d121aa4cc1ae4235167cfd size: 1570
You would be able to see this image on Harbor private registry:

You should be ready to consume this image with Karbon k8s cluster.
-
Harbor configuration inside k8s cluster:
For docker to start using the Harbor private registry in a secure manner and pull images, you need to create a docker-registry secret within Kubernetes. To do this run the below command on the k8s master node:
1[nutanix@karbon-stalin-k8s-1-088899-k8s-master-0 ~]$ kubectl create secret docker-registry regcred --docker-server=registry-srv.example.com --docker-username=stalin --docker-password=Nutanix/4u
2secret/regcred created
You are all set to start using images from Harbor private registry. All that's left is to use the image with the pod manifest file as below:
 1[nutanix@karbon-stalin-k8s-1-088899-k8s-master-0 ~]$ cat nginx.yaml
 2apiVersion: v1
 3kind: Pod
 4metadata:
 5  name: nginx-priv
 6spec:
 7  containers:
 8  - name: nginx-priv-container
 9    image: registry-srv.example.com/library/stalin/nginx
10  imagePullSecrets:
11  - name: regcred
Run the kubectl create command to create the pod:
1[nutanix@karbon-stalin-k8s-1-088899-k8s-master-0 ~]$ kubectl create -f nginx.yaml
2pod/nginx-priv created
You would shortly see the pod in Running state:
1[nutanix@karbon-stalin-k8s-1-088899-k8s-master-0 ~]$ kubectl get pods
2NAME                      READY   STATUS    RESTARTS   AGE
3nginx-priv                1/1     Running   0          5s
4nginx3-6f86f99744-n2s4j   1/1     Running   0          8d