Dude, Where is My Storage? (Hint: It is on TrueNAS with NFS!)
Looking for a reliable and easy-to-manage storage solution for your Proxmox virtual machines? This guide shows you how to combine the power of TrueNAS and Proxmox using NFS (Network File System). We'll walk you through setting up a centralized storage space on your TrueNAS system and then connecting your Proxmox to access it seamlessly.
Think of it like building a robust and user-friendly storage hub for all your VMs! We'll keep things clear and straightforward, with step-by-step instructions and helpful tips to guide you. By the end, you'll have a dependable storage solution that simplifies your virtual environment and makes managing your VMs a breeze.
Creating a Dataset and NFS Share
While TrueNAS offers SMB and Zvol options, NFS is often preferred for Linux-based VMs due to its inherent compatibility. Although Zvol boasts performance advantages, its configuration can be more complex. This guide focuses on the simplicity and effectiveness of NFS shares.
Here's how to create your NFS share:
- Access the TrueNAS portal.
- Navigate to Datasets and click Add Dataset.
- Assign a name to your dataset.
- Under Dataset Preset, select Multiprotocol. This will enable both NFS and SMB shares by default.
- Uncheck the SMB share option to create an NFS share exclusively.
- (Optional) Click on Advanced Options to set quotas. This helps prevent the dataset from consuming the entire pool's capacity.

- Click Save to create the dataset and NFS share simultaneously.
Enhancing Security: Creating a Dedicated User and Group
To bolster security and control access, it's recommended to create a dedicated user and group specifically for the NFS share. This approach avoids granting excessive permissions to the TrueNAS server.
Follow these steps:
- Go to Credentials and select Users.
- Click Add.
- Enter a username and password.
- Uncheck the SMB User checkbox as this user will only access the NFS share.*
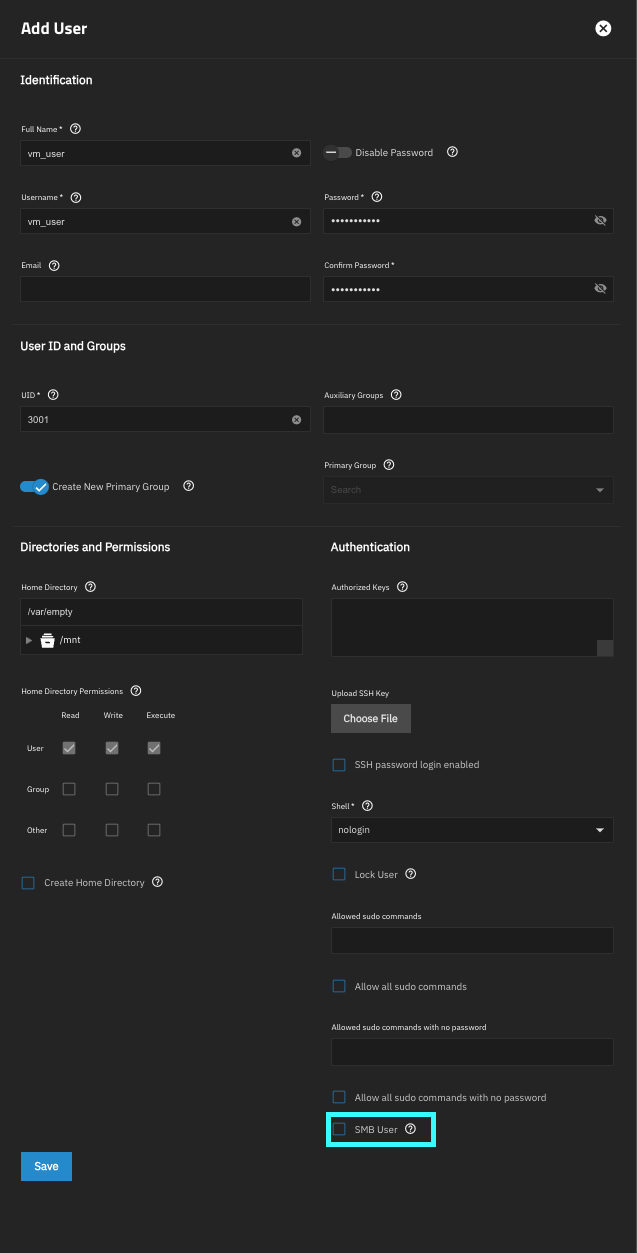
- Click Save to apply the settings.
Binding the User to the Dataset
Now, let's configure the dataset permissions and map the newly created user to the NFS share, enabling Proxmox access.
- Navigate to Datasets and select the dataset you created.
- Click Edit under Permissions to open the Unix Permissions Editor.
- From the User and Group dropdowns, select the user and group created earlier.
- Adjust the Read, Write, Execute permissions in the Access Mode section as needed. Ensure the user has at least full permissions.
- Check the Apply User and Apply Group checkboxes to enforce the permissions.
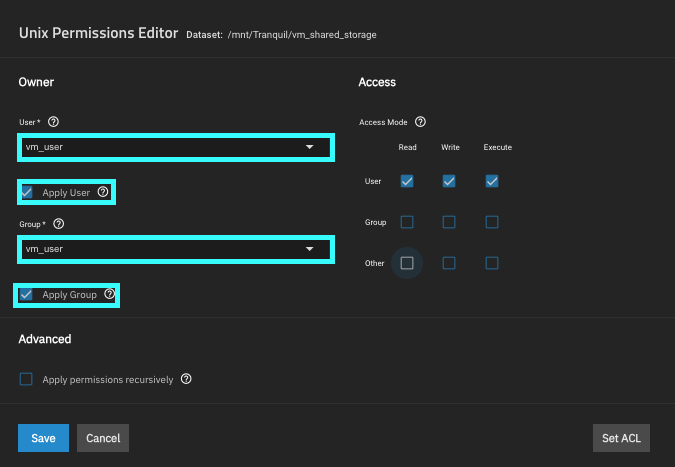
- Click Save to configure the user for the dataset.
- Now, navigate to Shares and then UNIX (NFS) Shares.
- Click the pencil icon next to your share to open the Edit NFS Share pane.
- Click Advanced Options.
- From the Mapall User and Mapall Group dropdowns, select the dedicated user. This maps the user to the NFS share.
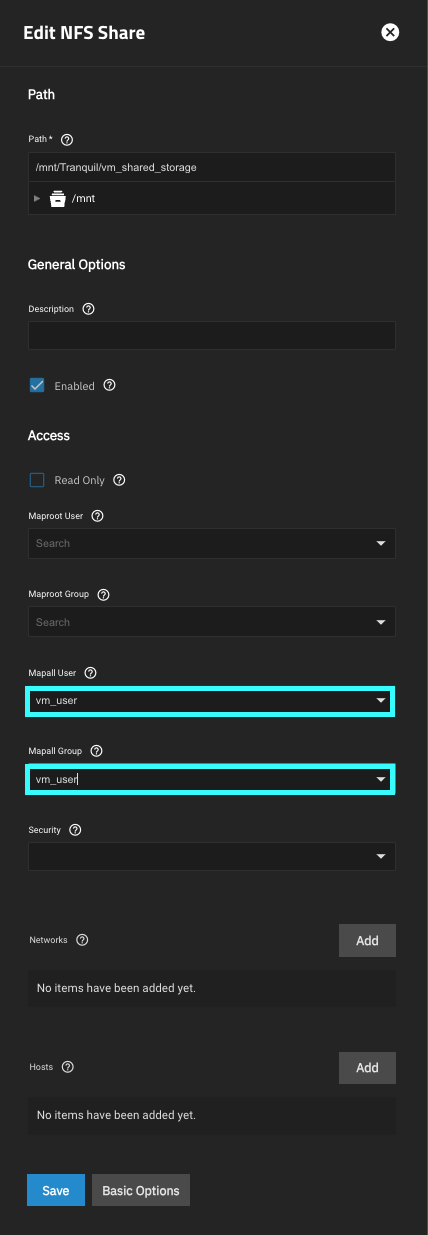
- Click Save to apply the settings.
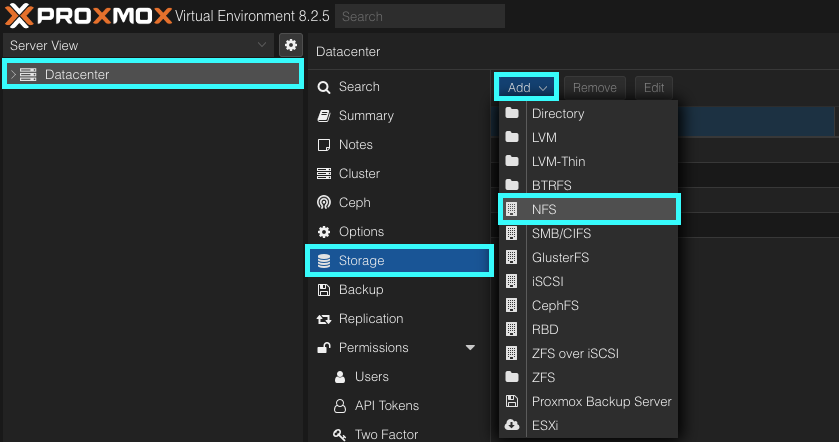
Connecting the NFS Share to Proxmox
Finally, let's connect your Proxmox hypervisor to the newly created NFS share on your TrueNAS server.
- Log in to the Proxmox web UI.
- Click on Datacenter and select Storage.
- Click Add and choose NFS from the dropdown menu.
- In the ID field, enter a descriptive name for the share.
- Provide the IP address of your TrueNAS server in the Server field. This will populate the available shares.
- Select the desired share from the Export dropdown menu.
- Specify the type of data you intend to store on this share using the Content dropdown.
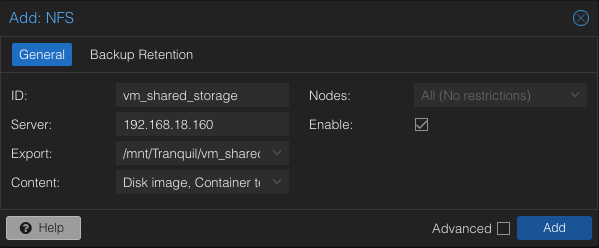
- Click Add to establish the connection.
Utilizing the NFS Share
Congratulations! Your NFS share is now accessible from your Proxmox hypervisor. You can use this centralized storage for a variety of purposes, including:
- Storing VM disks: Create new VMs and utilize the NFS share for their disk images.
- Backups and snapshots: Securely store backups and snapshots of your VMs on the NFS share.
This setup provides a flexible and reliable foundation for your Proxmox environment. Explore the possibilities and tailor the usage to your specific needs.