How to Automate Uptime Kuma Monitors with AutoKuma using Docker Labels.
Introduction
If you’ve used Uptime Kuma, you already know how great it is for keeping track of service availability. But if you’re running multiple containers that change often, manually adding new monitors or updating existing monitors can get old quickly. That’s where AutoKuma comes in.
AutoKuma is a small but powerful automation service that connects directly with Uptime Kuma and automatically creates or removes monitors as your containers start or stop. It does this by reading Docker labels that you define in your workload containers. Those labels tell AutoKuma what and how to monitor - for example, an HTTP endpoint, a TCP port, or even a ping check.
To make this possible, AutoKuma mounts the Docker socket (/var/run/docker.sock) inside its container. This gives it read access to container metadata, including the labels we attach to workloads. Whenever a new container starts or stops, AutoKuma listens to that event and updates the monitors in Uptime Kuma accordingly.
If you haven’t installed Uptime Kuma yet, you can follow this detailed guide on How to Install Uptime Kuma using Docker Compose
Once you’ve got Uptime Kuma running, you’re ready to add AutoKuma to the setup.
Installing AutoKuma using Docker Compose
Let’s start by deploying AutoKuma using Docker Compose. Here’s an example docker-compose.yml snippet:
 1services:
 2  autokuma:
 3    image: ghcr.io/bigboot/autokuma:latest
 4    container_name: autokuma
 5    restart: unless-stopped
 6    volumes:
 7      - /var/run/docker.sock:/var/run/docker.sock
 8      - /home/stalin/compose_manifests/auto-kuma/auto-kuma-data:/data
 9    environment:
10      - AUTOKUMA_UPTIME_KUMA_URL=http://uptime-kuma-uat.thetinkerer.dev:3001
11      - AUTOKUMA_UPTIME_KUMA_USERNAME=stalin
12      - AUTOKUMA_UPTIME_KUMA_PASSWORD=Sup3RSecR3tP@$$wOrd
Here's a quick breakdown of the above docker compose file:
- Docker socket is mounted so AutoKuma can listen for container events and read labels.
- Environment variables tell AutoKuma where Uptime Kuma is running and how to log in.
TIP: You can run Uptime Kuma and AutoKuma together and use the depends_on attribute to ensure Uptime Kuma starts first before AutoKuma.
After saving the file, run:
1docker compose up -d
AutoKuma will start running in the background, quietly monitoring Docker for container changes. Check the AutoKuma container logs to ensure there are no error messages before you proceed to the next step.
Deploying a Workload Container with AutoKuma Labels
Now that AutoKuma is active, let’s deploy a simple nginx container with labels that instruct AutoKuma to create a new Uptime Kuma monitor automatically. AutoKuma interprets Docker container labels with the following format:
1<prefix>.<id>.<type>.<setting>: <value>
- <prefix>: Default is kuma unless changed using the DOCKER__LABEL_PREFIX env variable.
- <id>: A unique identifier for the monitor (ensure it's unique between all monitors).
- <type>: The type of the monitor as configured in Uptime Kuma.
- <setting>: The key of the value to be set.
- <value>: The value for the option.
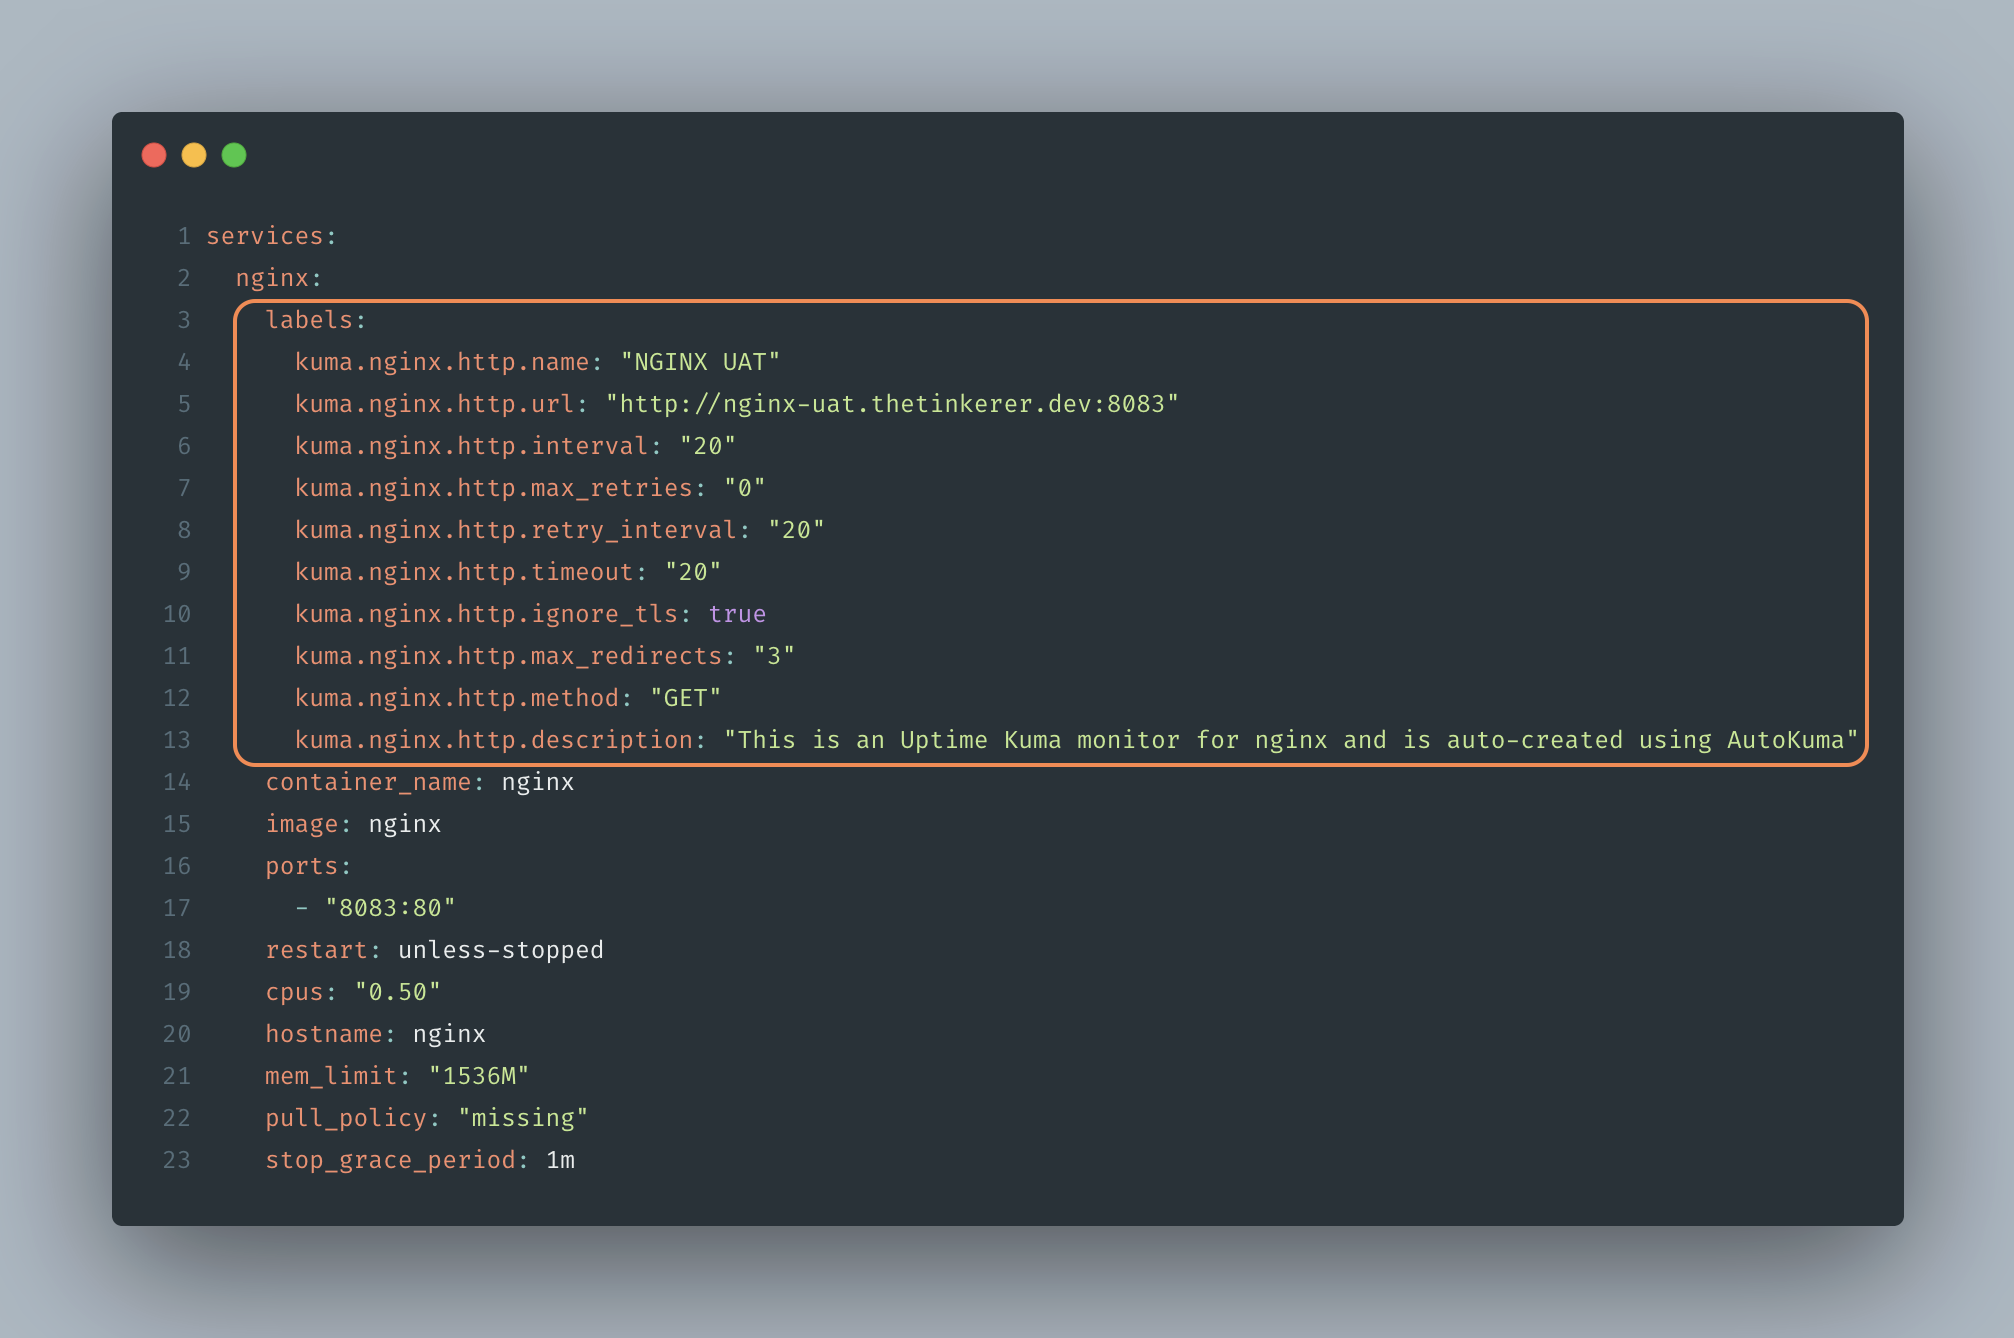
Here's an example of docker compose manifest for a nginx application that shows how to define labels in a format that AutoKuma interprets:
 1services:
 2  nginx:
 3    labels:
 4      kuma.nginx.http.name: "NGINX UAT"
 5      kuma.nginx.http.url: "http://nginx-uat.thetinkerer.dev:8083"
 6      kuma.nginx.http.interval: "20"
 7      kuma.nginx.http.max_retries: "0"
 8      kuma.nginx.http.retry_interval: "20"
 9      kuma.nginx.http.timeout: "20"
10      kuma.nginx.http.ignore_tls: true
11      kuma.nginx.http.max_redirects: "3"
12      kuma.nginx.http.method: "GET"
13      kuma.nginx.http.description: "This is an Uptime Kuma monitor for nginx and is auto-created using AutoKuma"
14    container_name: nginx
15    image: nginx
16    ports:
17      - "8083:80"
18    restart: unless-stopped
19    cpus: "0.50"
20    hostname: nginx
21    mem_limit: "1536M"
22    pull_policy: "missing"
23    stop_grace_period: 1m
The labels in the above docker compose manifest will instruct AutoKuma to create an Uptime Kuma monitor of type http with settings such as name, url, interval, method etc.
Once you have all the desired label settings defined, start the conatiner using the below command:
1docker compose up -d
Once this container starts, AutoKuma will:
- Detect the new nginx docker container.
- Read the labels from it.
- Create a corresponding HTTP monitor inside Uptime Kuma based on the defined settings.
If you check the Auto Kuma container logs and you should see the following message:
1INFO [autokuma::sync] Creating new Monitor: nginx
You can open Uptime Kuma’s dashboard, and under the Monitors section, you’ll see a new entry named “NGINX UAT” automatically created. If you stop or remove the nginx container, AutoKuma will remove the monitor too - keeping your dashboard perfectly in sync with your running workloads.
Conclusion:
In this guide, we covered how to install AutoKuma using Docker Compose and how to label your containers so it can automatically create monitors in Uptime Kuma.
This setup is especially handy for homelab, self-hosted environments, and DevOps workflows where containers come and go frequently. Instead of manually adding or removing monitors every time, AutoKuma keeps everything up to date automatically.
It’s a clean, efficient way to maintain visibility over your services without adding extra steps to your deployment process.
If you’re already running Uptime Kuma, adding AutoKuma is a small improvement that makes a big difference in how you manage and monitor your workloads.
In you are interested in exploring more about this project, check the official AutoKuma GitHub page.